

How To Modify Start Menu In Windows 10
The Outset Bill of fare in Windows x combines the best of both Windows worlds: The carte du jour-based list that began in Windows 95 and the tile-based interface introduced in Windows 8. But click or tap on the Start button and yous meet both merged into one interface. Convenient.
What'due south great well-nigh the Offset Menu is that it's highly customizable, from the base color to its overall width. This guide will tell you everything you demand to know about the Windows 10 Start Menu.
Breaking down the Start Carte
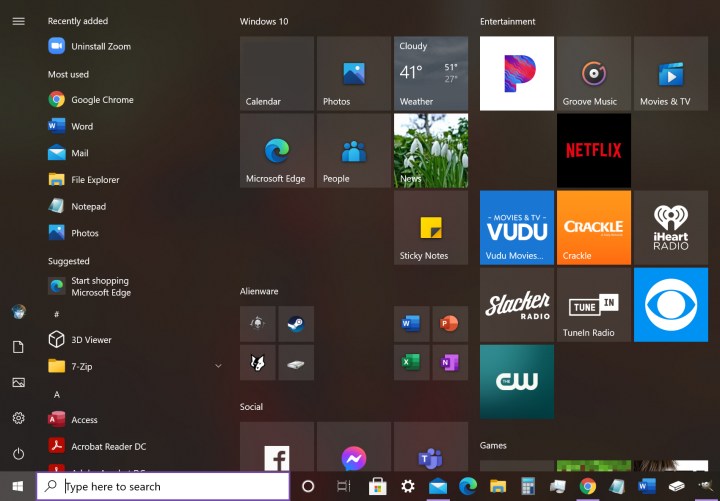
The Starting time Card actually has 3 parts: The Menu, the All Apps listing, and the Tiles area.
The Menu flushes upwardly against the left edge and provides shortcuts to the settings, documents, and pictures. Here you can besides sign out of your profile and shut downwardly the PC.
Adjacent to the Menu is the All Apps list. At the top, you may run into categories for Recently Added, About Used, and Suggested categories followed past all apps and programs installed on your PC. Some of these are clearly listed while others volition reside within parent folders. This list scrolls separately from the Tiles area located on the right.
The Tiles area is what connects your desktop experience to the touch-based aspect of Windows x. It's by and large the merely interface on Xbox consoles and the easier input method on Surface devices (and other Windows ten bear upon PCs). Y'all can actually switch to "tablet mode" and use zippo but Tiles if that'southward your thing.
While yous can't disable the Tile area, you lot can unpin Tiles from the Beginning Menu.
Resize the Start Menu
If yous want to change the size of the Start Menu, here'south how:
Footstep 1: Identify the cursor over the top or right edge until it becomes ii arrows.
Footstep 2: Click and hold the primary mouse button.
Step three: Drag the mouse up or right, depending on the edge.
Step iv: Release the button when yous reach the desired height or width.
Pace 5: Repeat for the other side every bit needed.
Note: You can place the cursor in the Start Carte'southward peak-right corner and just drag that corner to resize both edges.
Making the menu larger vertically will give more infinite to the All Apps list and the Tiles area while adding horizontal space will only extend the Tiles. At its smallest horizontal setting, the Start Menu can merely handle 3 medium columns of the smaller Tiles, but at its maximum setting, it tin fit six.
Use Showtime Total Screen
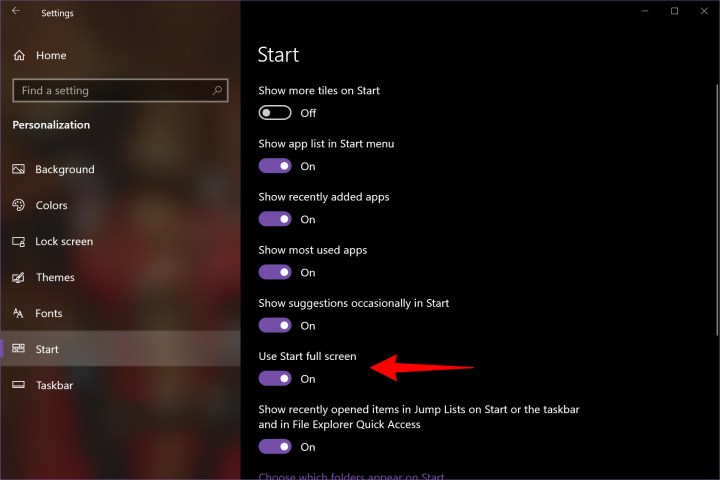
If y'all really prefer the full-screen Commencement interface from Windows 8, you can get it back in Windows 10. Hither's how:
Step one: Click the Notifications icon on the taskbar followed past the All Settings tile in the Action Centre. This opens the Settings app.
Step 2: Select Personalization.
Step 3: Select Start.
Stride iv: Click the Toggle next to Use Beginning Full Screen to switch this characteristic on.
Now, when you click the Offset button, the Start Menu fills the screen with a translucent overlay. The All Apps list is gone simply the Menu remains. The desktop aspect is still intact, however, so you're not locked into a tablet interface.
Add or remove folders
With the Personalization menu withal open, yous can tweak other options to customize the Start Menu. Hither we can add or remove folders displayed on the Carte portion. This tin can assistance atomic number 82 you to specific sections of Windows 10, like where information technology stashes your videos and music, and where information technology downloads files by default.
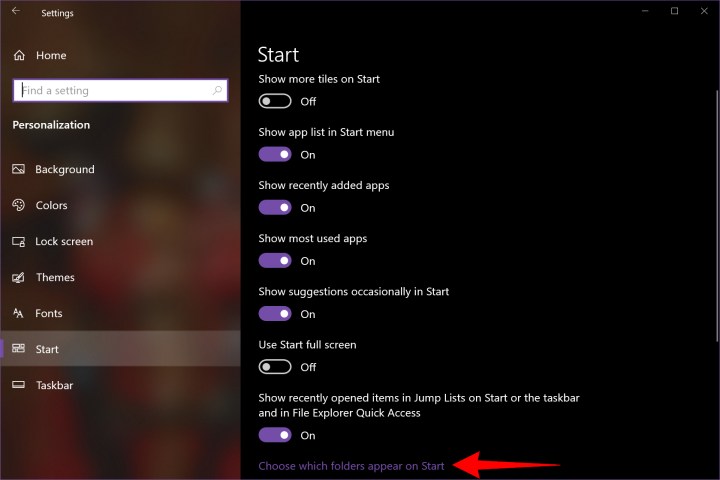
Step ane: Click the Choose Which Folders Appear On Start link.
Step 2: Click a Toggle adjacent to the binder you want to announced on the Menu. There are ten folders y'all tin enable or disable.
Note: The Personal Folder selection leads to your contour folder in the Users directory. The Network folder shows all devices connected to the local network.
Change the colour
You can switch the Start Card's color, simply the changes tin can also touch on other sections and apps on Windows. These instructions assume you are still on the Personalization panel.

Step ane: Select Colors listed on the left.
Step 2: Outset, you accept the selection to choose a Lite way, Nighttime way, or Custom mode. Custom will bring upward two additional sections for choosing Light or Dark for both Windows and apps. If you are peculiarly interested in choosing Dark way only for your Outset Menu, you lot will want to choose Nighttime under Choose Your Default App Manner, or otherwise simply set everything to Night with the top card.
Step 3: Click the Toggle next to Transparency Effects to turn this feature on or off. Transparency will slow downwards older PCs, so exist wary of possible performance drops with this toggled on.

Stride iv: By default, the accent color is called automatically based on your desktop wallpaper. If you like the style Windows looks now, merely leave it solitary. If not, uncheck the box adjacent to Automatically Selection an Accent Color From My Background to disable this characteristic. Now y'all can move on to Step 5.
Footstep 5: Click on a color swatch to define an accent color or click the Plus symbol side by side to Custom Color to create your own.
Footstep 6:You lot will see a final section for choosing where the emphasis color will appear. Click the box adjacent to Beginning, Taskbar, and Activity Center to apply the accent color to these items — this is the option that will have the most impact on the Start Menu itself. You can also choose to include Title Bars and Window Borders if you prefer, but this will accept less of an impact on the Beginning Menu itself.
All of these settings are applied immediately. You can meet the results past viewing the thumbnail at the top of the Personalization section or just clicking the Start button.
Hide all or some apps on the menu
Maybe you don't want to see all those apps and programs crowding the Start Card. With this toggle, Windows 10 will cram the All Apps list under the Menu strip. This listing is typically enabled by default, expanding the Get-go Menu across the screen.
Step 1: Click the Notifications icon on the taskbar followed by the All Settings tile in the Action Center. This opens the Settings app.
Step two: Select Personalization.
Footstep 3: Select Offset.
Step 4: Click the Toggle next to Show App List in Beginning Menu to disable the listing. Click it once more to bring the list back.
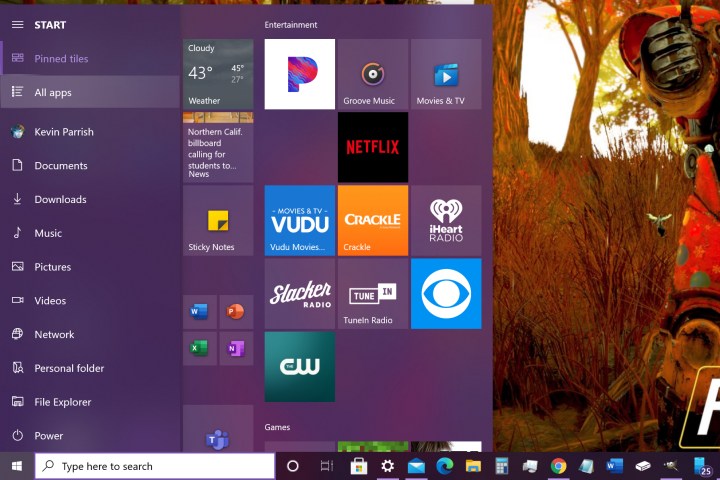
When you click the Start push, the All Apps list is now shoved into the Menu.
Step 5: Click the All Apps icon on the left to see your listing of apps and programs.
Step 6: Annotation that at that place are several other app toggles you can utilize for a more customized experience. For example, if you don't like seeing ads or news near new features, you should brand sure Show Suggestions Occasionally In Offset. If y'all want to see some of your oft used apps only avoid clutter, you lot can toggle everything off except Testify Most Used Apps. Tailor what shows up to your preferences.
Annotation: Once y'all return to the desktop and click the Start button again, the Offset Carte defaults back to the Pinned Tiles view. Click the All Apps icon once again to access your software.
Using the Menu
By default, the Card portion of the First Menu is collapsed into a narrow strip with icons, as shown above. It usually expands after a second to reveal their associated designations. The iii-line "hamburger" icon will plummet this strip.
Everything on the Menu should be cocky-explanatory. If you toggled off the All Apps list, you'll see an additional Pinned Tiles icon you can click to access these tiles if the Offset Menu currently displays the All Apps list. The Settings "cog" icon is not available in the mode.
Click your Contour icon and a pop-up menu appears with options to modify the account settings, lock the PC, sign out of the account, or switch to another registered account. Click the Ability icon and you can cull to Sleep, Shut Downwards, or Restart the reckoner.
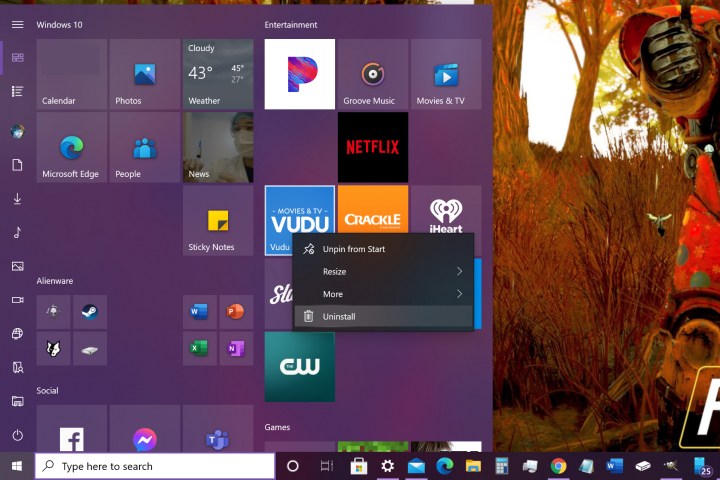
Right-click whatsoever item, and yous'll open up the context menu. Programs can exist pinned to the Taskbar or the Tile section. Nigh programs, including some of the new Universal Windows Apps, tin can exist directly uninstalled from this right-click window. If the list entry is only a binder or a shortcut, yous tin can open its location in File Explorer.
Using the Tiles area
Tiles are based on Microsoft'southward mobile app interface for tablets and phones — they're fifty-fifty used on Xbox consoles. They were originally introduced with Windows eight, but Microsoft caved in and revamped the Windows interface to render the desktop experience to desktops and laptops in Windows 8.ane. Tiles are still a big part of Microsoft's multi-device feel, yet.
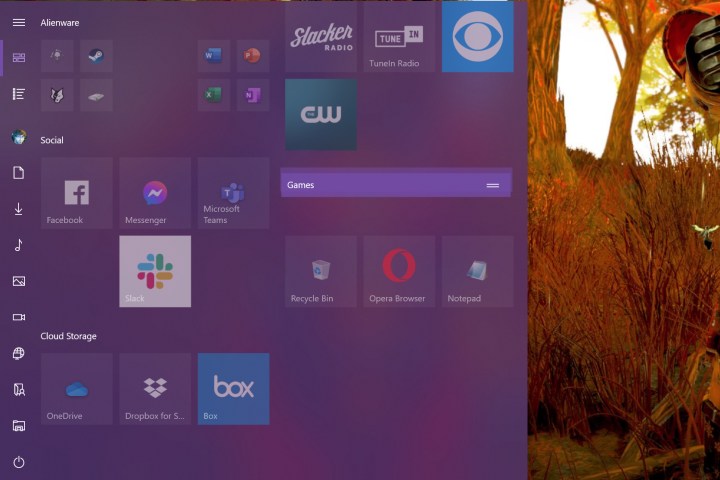
Each Tile tin be dragged and dropped to a new spot in the Tile area, and groups of Tiles tin be rearranged, renamed, or deleted. By default, the Tile surface area groups apps and programs into specific categories.
Rename an app group
Footstep 1: Hover the mouse cursor over the grouping proper name until two horizontal lines appear.
Pace 2: Click on those two lines.
Step 3: Enter the name into the text field and then press the Enter key.
Move an app group
Step one: Hover the mouse cursor over the grouping name until 2 horizontal lines appear.
Stride two: Click and concur on those two lines.
Stride 3: Elevate the group to the target location.
Step four: Release the mouse push button.
Unpin an app grouping
Step 1: Right-click on the Group's name.
Step 2: Select Unpin Grouping From Start on the pop-up menu.
Add a Tile
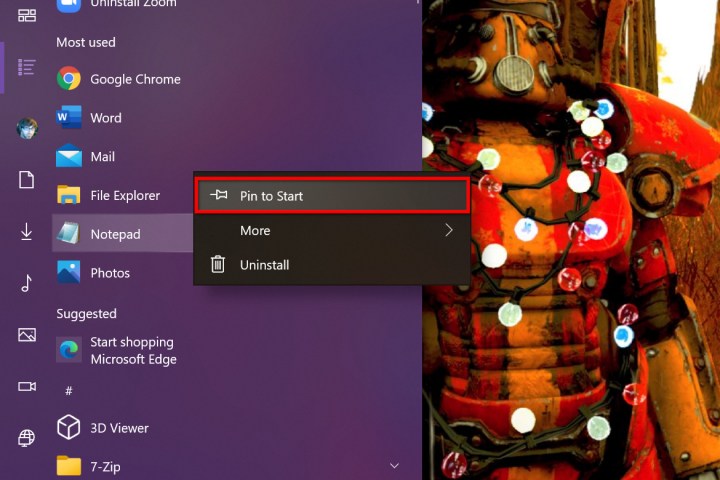
Footstep 1: Right-click on the App or programme listed on the All Apps listing.
Step 2: Select Pivot to Start on the pop-upward card.
Step 3: The tile now appears in the Tiles area. Click and agree the Tile and then move the mouse.
Step 4: The Tile pops upwards from the interface. Apply the mouse to elevate the Tile to its proper destination and then release the mouse push.
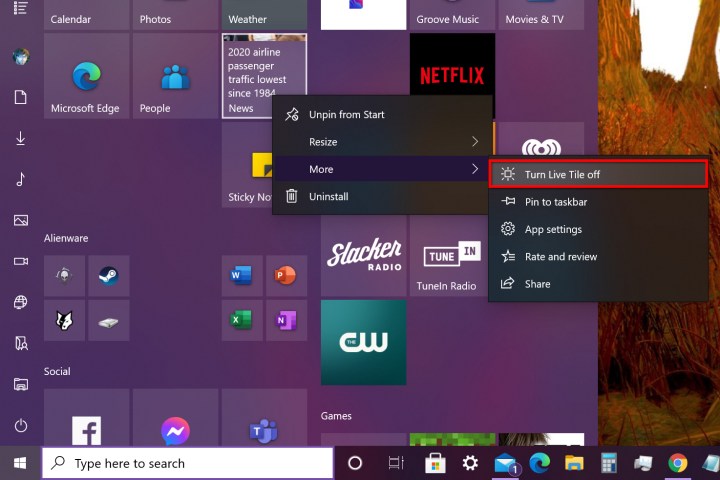
Disable a Live Tile animation
Well-nigh Tiles are merely shortcuts, but some Universal Windows Apps include "live" animation (aka Live Tiles). Like smartphone and tablet apps, these Tiles are locked to a grid in the Tiles expanse.
The default blithe Live Tiles include apps from Microsoft like Weather, News, and Sports. Some applications downloaded from the Windows Shop too include Live Tile functionality. Hither'southward how to disable those animations:
Footstep 1: Right-click on the Live Tile you want to freeze.
Pace 2: Select More than on the pop-up menu.
Step iii: Select Turn Live Tile Off on the expanded bill of fare.
Resize a tile
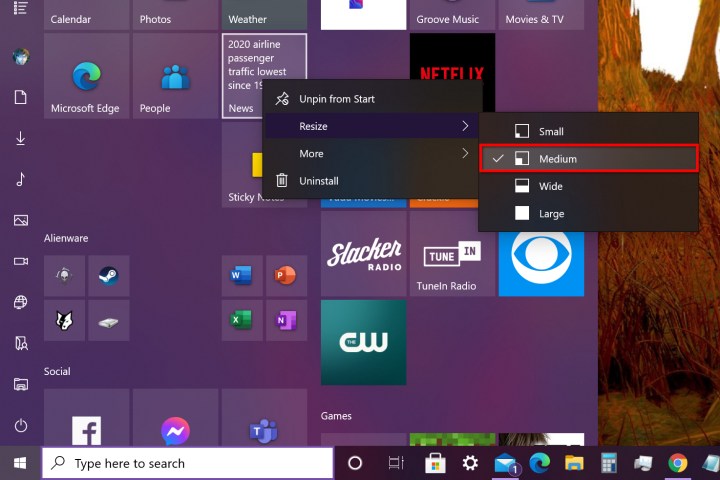
Pace one: Correct-click on the Tile you want to resize.
Step 2: Select Resize on the pop-up menu.
Step 3: Select one of 4 options on the expanded menu: Minor, Medium, Wide, or Large.
The default size is Medium, which takes upward one square space on the Tile surface area. It'southward also the smallest size which allows a Live Tile to still animate.
Small Tiles are one-fourth the size of medium Tiles, and you can fit four shortcuts into a single square on the Tile surface area.
Broad Tiles are 2×1 rectangles, twice the size of a medium Tile. These are useful for frequently-used programs or animated Alive Tiles with larger text elements, like News.
The Big setting takes upwards 4 square blocks, four times the size of Medium, and sixteen times the size of Small. These are useful for animated Live Tiles with big photographic or information displays, similar Mail service and Weather.
The Start Carte in Windows xi
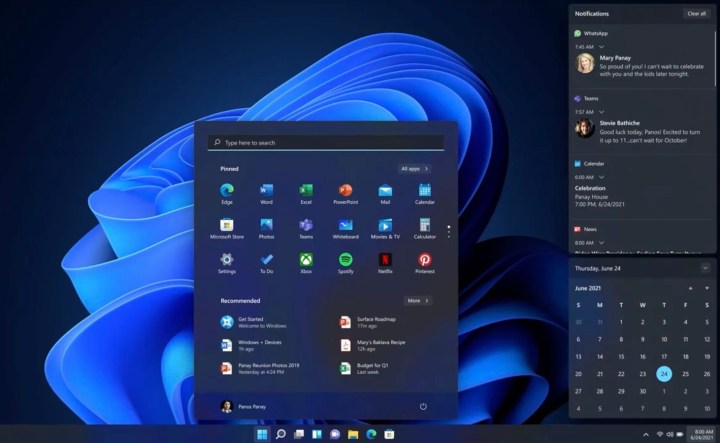
Microsoft was planning several design changes for a mobile-friendly version of Windows 10 called 10X, but these plans were eventually rolled into Windows 11. Windows 11, which is available in previews now, offers a more than minimalistic version of the Starting time Carte with rounded edges, less separation betwixt elements, and a greater focus on pinning what you need.
Users volition too accept the option to motility the Showtime Menu and related icons back and forth across the taskbar to wherever they find this section well-nigh useful. Combine that with the long-awaited return of widget supports on Windows xi, and yous can expect your login process to be much more personalized when you are ready to upgrade.
Editors' Recommendations
- Google Meet will officially combine with Google Duo in late 2022
- Hackers can at present take over your computer through Microsoft Give-and-take
- All-time desktop computer deals for June 2022
- All-time HP laptop deals for June 2022
- Twitter Circle is coming soon. Here'southward what you need to know
Source: https://www.digitaltrends.com/computing/how-to-make-the-windows-10-start-menu-do-what-you-want/
Posted by: sampsonnakenceral.blogspot.com
0 Response to "How To Modify Start Menu In Windows 10"
Post a Comment